Showing posts with label Workshop. Show all posts

Saturday, September 22, 2012

American Style Flower Arranging (part 7) : Practicing Time

Still remember the workshop of American Style by Andy Djati Utomo, S.Sn, AIFD, CFD? After the first session ended and all the participants got their lunch, it's time for practicing! Then the materials were distributed to all participants. The organizer provided several kinds of vases made of ceramic or wicker woven but unfortunately they couldn't choose what they like. They have just accepted what given to them. Also, when in the first session the participants saw lots of unique flowers and leaves used, but for practicing the organizer provided only standard flowers and leaves such as roses, gerbera, snapdragon (some got tuberose fragrant, instead) and futoy, foxtail leaves, cordyline and areca palm. Each participant was given 5 stems for every flowers and foliage. And they had to make the American style flower arrangement in 30-45 minutes. It's rather a short time for the participant who is familiar with the European style and for the first time got this theory. But we were amazed by their spirit to try something new 
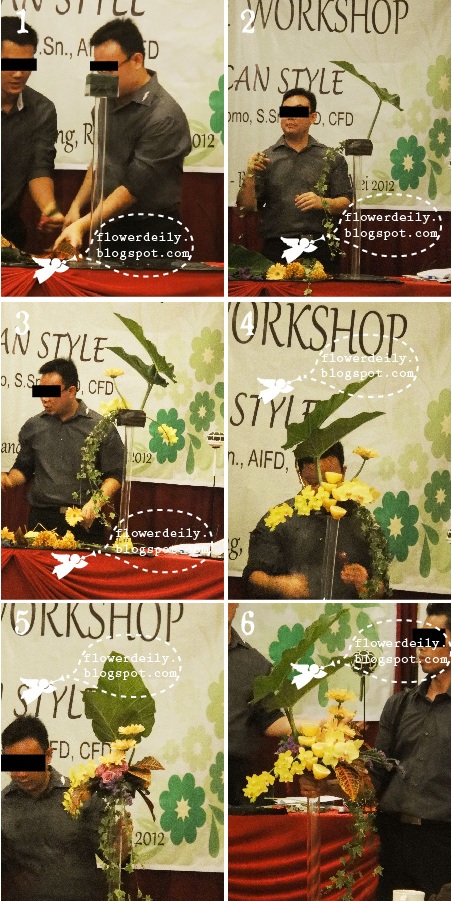
though some of them were not young people. Just look at this one.


It's pretty good since this was the first time of her to make an American style flower arrangement. More over she could absorb the theory given and then implement it. Here she used most of the American floral design techniques such grouping, basing, terracing, framing and layering. She just should be more careful with the proportion or balancing in her design. That's all.


And here it is how to make an easy American style flower arrangement just like the one above step by step:
1.                  Prepare the container and then fill it with wet floral foam. If you use a tall ceramic vase with small mouth just like this one, then you need the foam thicker than the usual at about 3-4 cm from the mouth of the container so that you don't run out of space to place the materials.
2.                  Then trim the fourth tip fringe of the foam
3.                  Place the cordyline, 2 stems on the left side and 3 stems which 2 of them folded on the right side by using terracing technique.


4.                  Take 5 stems of foxtail leaf then place 3 of them on the center and 2 stems which were a little bit shorter at the front
5.            Take roses of ‘Mohana’, place them by using terracing technique. Then take gerberas, place 3 stems at the front using basing technique and 2 stems higher on the left side. After that place the white snapdragon by using layering technique.
6.                 Take futoy, fill inside with wire, then shape them just like the shape of insect repellent. Place them on the right side.  Pay attention to the length, always keep the proportion or balancing, so the design would be just perfect. Finished.

Tuesday, September 4, 2012

American Style Flower Arranging (part 6): Bridal Bouquet

Hand bouquet commonly held horizontally by Indonesian brides, but held vertically by American, just like holding an ice cone. It usually gives the consequences of different in making, in using techniques,  in design, in concept and of course in look as the final result. For those who are looking for something different, unusual, new, or beyond your daily look, this one is perfect for you guys. We personally like this bridal bouquet. The design is unique, so bravo for the floral designer, Mr. Andy Djati Utomo, S.Sn, AIFD, CFD.


From the image above, you can see that not only the basic American Floral Design Techniques such as basing, grouping and terracing techniques were used here but also binding, framing, and sheltering as well. Perfect example, isn’t it?


Wanna try to make the beautiful American style bouquet just like the one above? Here’s the step by step how to make it:
1.          First of all, Mr. Andy Djati Utomo showed how the American brides to hold the bouquet - vertically, just like holding an ice-cream cone.
2.               Take 3 pieces of woven leaves of lily paris, then place them in a group at the front. Arrange the length of them that do not look monotonous . Take some ivy leaves. If they're not thick enough and don't dangling beautifully, then tie two ivy leaves with floral wire from the top up to the end so that you are now able to form it as you wish.
3.            Take 2 stems of green anthurium. As we need rather high, so attach floral wire to the stem, then secured it with floral tape. Place them by using terracing technique to balance the lily paris leaves.
Take 3 stems of pink gerbera. Cut them short enough then place them as focus in the center by using terracing technique.
Take 4 stems of two tone color of calla lily (white & maroon) then place them a bit on the right side of lily paris leaves by using layering technique.
Take 2 stems of futoy, insert the wire into the stem then by using framing technique, place them to the opposite side of the calla lilies to give balancing of the right and left side of the flowers arrangement.
Then place the other flowers rest such as caspea, statice, purple roses and red celocia. Also do not forget to fill the foam seen with ruscus leaf.
4.         One more, don’t let the holder looks plain, so this is how to make ‘under the holder’ looks different. It’s done by Mr. Johanes Priyono, the assistant of Mr. Andy.
5.                   Finished.


 This is how the bouquet look from the front


Since it was held vertically, therefore, the back of the bridal bouquet is usually vacant. So as not to contact with the body of the bride as well as her wedding gown because some types of flowers, such as lilies can leave stain (from its stigmas) that not able to be washed easily. So, please be careful if you do with bridal bouquet. Give extra attention to the flowers selection and to the work, for example, do not let any thorns still attached to the stems of the roses that can injure the bride's hands or tear the wedding gown. You don’t want to be sued or pay for compensation, do you?

Note:
Pictures taken at the workshop by Andy Djati Utomo, S.Sn, AIFD, CFD, on May 16th, 2012 in Bandung, West Java.

Sunday, August 12, 2012

Workshop Ribbon (part 4): A Variation of Ribbon Bow


 This is another variation on the basic ribbon bow. It’s like a lotus flower. Unique, isn’t it?


Here it’s step by step to make a lotus flower ribbon bow.
Step 1 Make some loops then tied with wire (see again the basic ribbon post)
Step 2 Take a loop then cut it off in the middle.


Step 3 Take another loop. Again, cut it off but longer than the first one. Repeat this until the last loop. Make sure each time you cut, it's longer than the previous one.
Step 4 Cut the both ends so that it'll look curved
Step 5 By using one side of sharp scissors and your fingers, make an upward curved movement on each end so they stay curly.
            Shape it so that it'll look natural.

By this way you can also make another different look of flowers such as spider chrysant. Use a narrow ribbon or just divide the ribbon into 2 but you should make more loops ie doubled thicker. Try it!!

Note:
Images taken at the IPBI DPC Bandung's Monthly Gathering on May 24th, 2012.
Instructor: Mr. Harry Zulkarnaen

Saturday, August 4, 2012

Workshop Ribbon (part 3) : A Loopy Ribbon Bow


By giving a bit variation on a basic ribbon bow (see our old post on Ribbon Workshop – part 2, July 12th.), you can get another look of ribbon, just like this one - a loopy ribbon.  It looks nice on gift boxes, too.  


Here it’s step by step how to make the loopy ribbon just like the image above:
Step 1.            Make some loops then tied with wire (see again the basic ribbon post)
                        Just like as if you made a butterfly with 2 wings, the left and right wing/loop.
Step 2.            Ok, first do on the left wing/loop. Find the top of loop then cut a bit the right edge, be careful do not cut it off. (see the image below)


Step 3.            Do the same to the other side, but this time in the opposite direction or vice versa. Now we get the left loop just like the image above.
Step 4.            Repeat step 2&3 in the same way on the right loop. The final look of the loop should be like this. (image below)
                      At this point you just pull the loop one by one, starting from the middle to the outer loop/last loop. Shape it how you’d like.


This is what it will look if you've gathered 2 different color of loopy bows. (image above)
And this is when you gather 3 orange loopy bows. It looks full, just like a ball. Gorgeous, isn’t it?  It's also nice as a wedding décor. Simple and easy to make, as well as not expensive. (image below)

Note:
Images taken at the IPBI DPC Bandung's Monthly Gathering on May 24th, 2012West Java. 
Instructor: Mr. Harry Zulkarnaen


Saturday, July 28, 2012

American Style Flower Arranging (part 5)

This is another example of American style to place big flower/leaf on top, which is not common at first, while in European style, the biggest material is usually placed at the bottom and the smaller at the upper. But as long as the small flowers/leaves are laid in grouping or you can also use terracing technique, so overall they will be looked big because they’re viewed as a unity and not per stem.  So, no problem with placing big material on top, right? It will even make the design look special and not customarily. We personally like this one. It’s unique!!


Close up look 


Here they are how to make this beautiful unique American-style flower arrangement step by step.
Step 1 Prepare a high acrylic vase. Fill the container with wet foam, leave 2-3 cm from top of the container then trim the edges of foam.
Step 2 Take 2 stems of big marble philo, attach the stems with wire. Then  by using sheltering techniques place  both leaves in the middle, not upright but slightly to the right.
            Take some ivy leaves. Hang them down opposite to philo leaves.
Step 3 Take 2 stems of orchid. Attach the stems with silver or copper wire, then place them on the right side.
            Take some statice then put on the left side to balance the orchid.
Step 4 Take 3 stems of gerbera, attach wire. Place them by using terracing technique starting from the middle to the left side. Arrange all the flowers facing above.
          Take 2 lemons, cut into 2 then prick the half lemon with skewer but careful, do not penetrate the other side. Then put them as focus by using terracing technique.
         Note: Do not use wire to prick the fruit, because fruit contains acid. If wire in contact with acid it would become rust which can change the fresh fruit into rotten as well as dangerously to be eaten.
Step 5 Take 4 croton leaves. By using terracing technique place 2 of them under the gerbera and the other 2 beside the orchid.
            Take some purple roses. Cut them short and place them between the croton leaves, above ivy leaves and statice.
            Take some ruscus. Cut them short, leaf by leaf. Then use them to fill the empty area so that no foam can be seen.
Step 6 Finished


The design looks like as if there was effect of rain or hot sun. Then the flowers would be covered by big leaves.  Just like umbrella protecting us from the scorching sun. Gorgeous!!

Note:
Pictures taken at the workshop by Andy Djati Utomo, S.Sn, AIFD, CFD, on May 16th, 2012 in Bandung, West Java.

Thursday, July 19, 2012

American Style Flower Arranging (part 4)


The American centerpiece in medium high

When viewed thoroughly, from any angles you see, it will form the 3 points in which if you draw an imaginary line among them it will become a triangle. So, this is the three-dimensional centerpiece that is very suitable to be placed on the table as home décor. 


Here’s the step by step tutorial how to make the American centerpiece
1.      Prepare the vase (rectangular shape), fill it with wet foam
Take 5 stems of gerbera, cut one of them with a height of 2x the width of the vase then place it upright in the middle of the foam. This will become the culmination of the centerpiece. Then place the four others surrounding it in group, each with different height. Arrange the gerberas facing all directions so that this centerpiece is beautifully viewed from the front, back and side.
2.      Take some caspea then place them on the right side
Take some red cordyline, place them opposite direction to the caspea by using terracing technique.
3.     Take 4 stems of hemalomena (a kind of anthurium but smaller), place them at the front (2 at the base and 2 rather high). Up to this stage, it has been looked like a three dimensional centerpiece.
Take some stems of snapdragon, place them between the red cordyline and the hemalomena and in the opposite also but shorter than the first ones.
4.     Add some statice. This flower is more purple than caspea but both of them are gorgeous and can be stand for days.
 As focus, use some purple roses, green carnations and red celocia. Place them on the three different sides at the center area by using basing technique and arrange them facing the different directions, too.
Finally, take 2 stems of futoy. Fill the stems with wire, then bend twice so that it become a triangular shape. Put the triangle near the green carnation area.
Finished


The american centerpiece viewed from the front

If in European style, the biggest material (whether flower or leaf) is usually placed at the bottom and the smaller at the upper, then in American style boldly laid big flower/leaf at the top. But overall, at first glance  some small flowers at the base look big because they are laid in grouping. So, actually it's only such a camouflage look! Have a nice try.

Note:
Pictures taken at the workshop by Andy Djati Utomo, S.Sn, AIFD, CFD, on May 16th, 2012 in Bandung, West Java.


Thursday, July 12, 2012

Workshop Ribbon (part 2) : A Basic Ribbon Bow


A basic ribbon bow. 
It’s easy to make this ribbon bow and the material is also simple and can be easily found at any floral accessories store. What you need are just polypropylene ribbon or famous as plastic ribbon and floral wire. And the only tool used is just scissors. You can choose any color as you wish. This time we used electric color.


How to make basic ribbon bow step by step:

Step 1. Prepare a 2 cm width of polypropylene ribbon.
Step 2. Cut the ribbon about 1.5 - 2 m long. then create loops by using your fingers. If you would like to make small bow, use the four fingers except thumb. But if you want to make bigger bow, use your thumb & small finger. This is what it will look when you’ve finished making loops.


Step 3. Fold into 2
Step 4. Hold it tightly so that not easily changed position. Then cut on both edge but be careful do not cut it off. Remain one third in the middle.


Step 5. Secure with floral wire no.26 (a thin & soft wire but strong enough to tie). It should look like this.
Step 6. Pull a loop with your fingers then turn 90° to the left or right. Once you rotate to the left then the next loop should also be turned in the same direction so that you’ll get the perfect result. Do exactly the same on the rest of the loops.
Step 7.  Shape it how you’d like, but make sure the right sides of ribbon (usually the shiny ones) were facing front. Cut the tails into a simple angle cut. Done


Note:
Images taken at the IPBI DPC Bandung's Monthly Gathering on May 24th, 2012West Java. 
Instructor: Mr. Harry Zulkarnaen

Friday, July 6, 2012

American Style Flower Arranging (part 3)

Gingers on the flower arrangements? Oh, ooo no way ... how come? Here is it, a flower arrangement which uses gingers as accessories. And actually, it's a medium-height of flower arrangement.


The image is the view from above.


The material used are carnation, anthurium, bromelia, omprina, celosia or cock-comb while the foliage is silver grass or simelaria, curly futoy stems, anthurium leaves, lily paris leaves or lily grass , foxtail, red & green cordyline and ruscus. Gingers and woven rattan balls as accessories, skewers, wire, a kind of soft copper wire, but this time choose the shiny white colour or silver as supporting tool.


Here is the step by step tutorial if you’d like to make it.
1.       Prepare a long container or a rectangular vase, then filled with wet foam.
Take some curly futoy stems, give floral tape at the bottom, then tied with wire. Do not forget to insert 2 pieces of skewer for easily placing.
2.       Take 3 anthurium leaves, then place them by using terracing technique.
Take 2 woven rattan balls, put sisal inside then placed them as focus at the center of the flower arrangement. One at the front and the other one a little bit at the back.
Take 3 lily grass, woven them by using soft silver wire then tied the edges by using bunching technique and then give floral tape. This technique is to shorten the working time. Attach the other edge with skewer and then placed it on the oasis.


1.       Take 6 gingers, choose the smooth-wide ones and then place them in 3 different places (front, back and right side) by using skewers, each contains 2 gingers
Take 4 bromelia flowers, place them on the right and left side just like cresent form.
Take some foxtail leaves to cover the left side area, the more and more toward the center. If not like this, then the terracing technique is failed.
Take green cordyline leaves, again used the terracing technique.
2.       Take red cordyline leaves, used basing and terracing technique
Take 2 alokasia triangularis leaves or ‘tombak irian’, placed them high and in front of the green cordyline.
Put the simelaria and carnations in different groups, under the alokasia leaves
Place the red celosia between the ginger and curly futoy stems.
Add omprina to add depth so as not to be flat.
Take 2 green anthurium flowers, wired and then placed beside the front gingers.
Finally insert ruscus into the empty place so that the wet foam can be seen. Cut them short.
Done.


Up close look from the front side (image above) and from the back side (image below).


Note:
Pictures taken at the workshop by Andy Djati Utomo S.Sn, AIFD, CFD, on May 16th, 2012 in Bandung, West Java.

Tuesday, July 3, 2012

IPBI DPC Bandung's Monthly Gathering: Workshop Ribbon (part 1)


These are kinds of ribbon that we made in the workshop


The atmosphere where the workshop took place. The participants worked diligently as directed by the instructor.


The box which used to be full of colourful plastic ribbons, now  left only a few (image above) and our instructor this time is Mr. Harry Zulkarnaen.(image below)


This is another variation of the ribbon, looks like 'needle or spider' chrysant flower or 'krisan jarum', right? (soft orange - left image) and by deviding the width of the ribbon into 2 or 3 parts (careful, do not cut it off) , you can also get different look of ribbon. (right image)

Note:
Images taken at the IPBI DPC Bandung's Monthly Gathering on May 24th. 2012.

Monday, June 25, 2012

American Style Flower Arranging (part 2)


The materials used to make the flower arrangement like this are snapdragon, gerberas, red and yellow celosia or cock comb and the foliage is anthurium leaf, red and green cordyline, futoy, alokasia or tombak Irian, justicia or rugball and ruscus.


And here’s the step by step tutorial:
  1. Prepare a round ceramic vase of medium height (15 - 20 cm). Fill in with wet floral foam, cut the top but leave 1 - 3 cm from the mouth of the vase and then trim the edges.
  2. Take a stem of snapdragon flower, measure the length approximately 3x the height of the vase, cut it. Then put it a bit in the middle, not in upright position but slightly skewed to the left. Do the same for the other two snapdragon but with different length, shorter than the first one.
Take 3 anthurium leaves, put it in sequence by using terracing techniques, give among them a bit distance so that not to stick together.
  1. Take 4 pieces of red cordyline, fold three of them each in different length. First put the longest leaf approximately 135° toward the right opposite the direction of the anthurium leaves, after that do the same for the rest of the leaves, all lead toward the middle.
  2. Take 3 pieces of green cordyline, now place them across from the red ones. Now the flowers arrangement has 3 dimensional look.
Take a gerbera, cut very short then attach at the front. From this one, do the same with the other four gerberas by using basing technique but in different height. 
Make all the gerberas facing upwards, so they look like flower protected by the other higher flowers.


  1. Take some futoy stems (20-25 cm long), stick together by using wire, then place it in the middle of the arrangement. (You might need 2-3 skewers to do this)
Take 2 alokasia leaves then put them opposite direction to the snapdragon.
  1. Take some red celosia, cut them short and place them at the front on the left side of the gerbera while on the right side filled with 2 snapdragon (cut shorter than the other snapdragon placed opposite)
Take 2 stems of yellow celosia, placed below the alokasia.
  1. Last one, put justicia or rugball among yellow celosia, green cordyline, and red celosia. Then fill the empty place with foliage, cut it short to cover the floral foam. Make sure that there isn’t any floral foam seen, ok?
  2. Done.

The flower arrangement seen from the front and side view.


Up close look (image above), the red and yellow celosia look fantastic while the justicia or rugball looks so cute, doesn’t it? It is alike yellow sisal.


Note:
Images taken at the workshop by Andy Djati Utomo S.Sn, AIFD, CFD, May 16th 2012, in Bandung.


Thursday, June 21, 2012

American Style Flower Arranging (part 1)

Still remember the workshop of Andy Djati Utomo which held by the IPBI DPC Bdg few weeks ago? We will write it into several posts just for you, our faithful readers, starting from this one. So, enjoy reading.


Here are some of the materials supplied by the sponsors. The flowers are snapdragon, anthurium, gerbera, celosia, bromelia, carnation, rubica, roses, caspea, phalaenopsis amabilis while the foliage's cordyline, futoy, foxtail, ruscus, lily paris leaf, anthurium marble, ivy, Ming fern and croton. There are some leaves that we seldom use ie. alokasia triangularis leaf or Tombak Irian, justicia or rugball (this one looks like yellow sisal), simelaria leaf, hemalomena leaf (it’s a kind of anthurium leaf but smaller in size).


As usual, Mr. Andy brought his assistants. That day he brought 3 assistants. They are Mr. Yohanes Triyono, Mr. Syaifuloh and uhmm... Mr. Choirudin(?) ups, I forgot the last one, sorry. They helped him preparing the materials such as filling futoy stem with wire so that it can be bent without broken or  sticking the flower stem with wire, especially for flowers which have soft stem such as gerberas, phalaenopsis, calla lilies and then covering it with floral tape. What they did were very helpful so that the workshop could run smoothly and finish on time.


Mr. Andy started his show by explaining characteristics of 3 styles in arranging flowers so that the participants could understand the differences among american, european and japanese style properly. If the european style is mass arranging, volume and uses a lot of flowers while Japanese style is vice versa, line arrangement and minimalist, then american style is between them ie 'mass-line' arrangement, there is space that is full or volume (usually in the center) but there is empty space and lines, too. The American style doesn't emphasize on the form of flower arrangement as in the european style. But it has a lot of flower arranging techniques. There are dozens techniques actually, and even added a new one every year, wow... In this occasion, Mr. Andy only taught three techniques ie basing, grouping and terracing.


These are some of the floral design made at the workshop. We'll give you a little glimpse, 'ginger & lemon'. Just imagine what kind of flower arrangement that would? Curious to know more? No other way, keep following our posting, ok?


Pictures taken at the workshop by Andy Djati Utomo, S.Sn, AIFD, CFD, May 16th 2012.

Saturday, June 2, 2012

The Bouquet Wrapping Ideas

Next on the flower workshop at Hero supermarket Bandung, was a demo and workshop on flower bouquet wrapping. Valentine’s still next year, but we’re very excited to see the wrapping technique!


Mmm… yellow, orange and spotlight green are said to be the wrapping color trend this year…. not to mention the bold red colored gerberas. First, the participants made the cascading flower bouquet by arranging few red gerberas, leaves of florida beauty, Xanadu or reptile split phylo and cordylne, secure it with floral tape. Next choose two color wrapping papers, wrap them one by one and last, tied the ribbons, and done!


The flowers were still red gerberas, but with lighter colored leaves and peach colored wrapping paper, the image instantly changed!!!


The enthusiastic ladies… wrap them tight !!!


This is the wrapping bouquet made by Mrs. Winny for Hero supermarket. See that the white roses were first covered with yellow wrapping paper before being arranged.


The close-up look on the ribbons.


Friday, April 27, 2012

IPBI DPC Bandung Will Hold a Workshop on May 16, 2012


Teman-teman, ada kabar gembira nih!

IPBI DPC Bandung akan mengadakan Workshop - oleh Andy Djati Utomo S.Sn, AIFD, CFD yang akan diselenggarakan pada:

Hari/tanggal : Rabu, 16 Mei 2012
Pukul : 10.00 s/d selesai
Tempat : Landmark Convention Hall, Jl. Braga 129 Bandung
Tema : American Style
Biaya : Rp.300.000,- (anggota IPBI)

Biaya sudah termasuk makan siang, vas, materi dan sertifikat. Harap membawa peralatan merangkai bunga (hasil rangkaian boleh dibawa pulang).

Pendaftaran paling lambat Kamis, 10 Mei 2012 ke Sekretaris IPBI DPC Bandung. Cepetan daftar ya karena pesertanya terbatas, loh!


Related Posts Plugin for WordPress, Blogger...

About Us

My photo
Hi!! Welcome to http://flowerdeily.blogspot.com. It is a floral design blog created and managed by Flo and little Flo. We have the same passion in any kinds that related to flowers especially Flo as she has been joining in a group of floral designers for church for dozen years. We wish to share our thought in flower arrangement, exchanging floral ideas and hopefully this can be an inspiration for your daily life, housing decor and of course for your wedding. Thanks so much for stopping by.