Showing posts with label tutorial. Show all posts

Wednesday, March 20, 2013

IPBI DPC Bandung Monthly Gathering: A Flower Decoration Demo for Easter

Hi All, long time no see, hope you guys are all ok.

Since we’re nearing Easter (wow time does fly so fast) as usual we’ll give you some ideas for flower decorations. Unlike last year’s Easter flower demo which full of serious theme arrangements, this year’s flower arrangements are more casual. A little bit taking much time for the structure but quite simple for the flower arranging. As we all know that Easter is always identical with eggs, that’s why Mrs. Ida Hermanto and Mrs. Kitty Catharina, the floral designers this time, use decorative eggs on their design, even the last one use a bunny head miniature on her design. She said that once upon the time, it is said the first animal to came out after the winter ends is rabbit.  Whether it is true or not, we don't know. However, the adding of those accessories have made the flower arrangement look more beautiful and really typical Easter.

And if you imagine the floral arrangement for Easter should be white, yellow, orange and purple, forget it!! That's the old opinion, now it's more colorful. You can use any color you like, just like the following image shown:


And here’s a sneak peek on the first session. Look at the nest made from natural sisal mesh and also the colourful eggs on top. Those eggs were made by Mrs Ida's child. Gorgeous!!


The finished look, this flower arrangement used grouping, basing, terracing and sheltering techniques. For the complete step by step tutorial, you can view them here.

For the beginners who would like to try this flower arrangement, we must remind it in advance that it's quite expensive since it needs a lot of materials. It's more suitable for commercial flowers hamper for Easter.


And the second session to perform the demo is Mrs. Kitty Catharina. Most of the materials she used here are flowers and foliage taken from her garden. So, who said garden flowers can't be beautifully arranged? This one proves it! 

For the complete step by step tutorial, you can view them here.


The detailed look seen from above. The bunny head miniature looks cute, right?


About 71 members were present at the last monthly gathering of IPBI DPC Bandung. And by voting, Mrs. Ling Ling was elected as the chairwoman for the period 2013 - 2016. Congratulation!!!


Note:
The images taken at the IPBI monthly gathering, February 28, 2013
The floral designers are Mrs. Ida Hermanto and Mrs. Kitty Catharina.

Wednesday, December 19, 2012

Wedding Flower Ideas by Eunice Teo (2) : A Unique Taste Bouquet with Hypericum


Detail… detail…. The first thing that attracted me to this bridal bouquet is the huge cactus or a kind of succulent at the center of the bouquet, then the pink-fuschia hypericum which is very eye-catching. It’s needed for the color.


Here’s how the bouquet looks like from the front. It’s a cascading shape with dried Lotus leaves hanging on the left and right side and also used the bird nest.  They’re not only to make texture but also give a unique taste to the bouquet since it’s not custom to use such materials on bouquet.


And this is how the bridal bouquet look like from the side. Overall it looks nice.
That’s it for today’s bridal bouquet ideas. Be patient for our next post!!!

Thursday, December 13, 2012

Wedding Flower Ideas by Eunice Teo (1): Intro


Another wedding flower ideas series!!! Yup, this year we’re pushing it by giving you all more and more bridal bouquets and wedding flower ideas. This time it’s a flower demo from Eunice Teo, AIFD, she’s from Malaysia and there’s even some Malaysians in the audience too.


Here are the flowers used, some of them imported and some local. The imported are tulips, calla lilies, hypericum and omprina. We saw new variant of cordyline sold there such as cordyline fruity and cordyline kiwi. The leaves look a bit small but more colourful.

Almost all of the flower arrangements in the demo were around 70% finished so she’s just add the finishing touch and gave us tips on how to make them, of course it’s a bit different with watching an arrangement made from scratch, however, the plus point is she can give more flower arrangements!


And finally the photo session!! Believe it or not this is the most tiring session of all. Pheew! I had to jostled, dodged being pushed to and fro just to get all the bridal bouquet and flower arrangements photos. Therefore if there’re some rather blurry ones, please forgive me J…. okaayy, just like our previous series, after this we will post all the gorgeous bouquets and flower arrangements one by one, so keep on checking …


Sunday, December 9, 2012

Bouquet Parade (2) : Extraordinary Orchid Bridal Bouquet in Cascade Style


For those of you who hate ordinary product, this can be your inspiration...A look as intricate as this requires an artistic florist who can create a kind of bridal bouquet…. Oh no, you’re not imagining it, those green ones are indeed long green beans J


The base of this bridal bouquet requires black aluminum wire, lots of rattan bangles and long green beans. First, make some spiral from the aluminum wire. Then interlock a rattan bangle to the other to make a long chain. After that,  enter the long rattan chain into the black spiral wire and adjust the wire to make the shape of the bouquet. You can also use wire to fasten them for a neater result and finally insert the long beans here and there to make them look solid. Do not use glue, but looped or bent only. Do this carefully because it's easily cut off… (yes, it’s definitely not for amateurs)


Overall, the base of the bridal bouquet would look like this. The front and back side


After the base was done, the rest was just attaching the white phalaenopsis and purple omprina with floral adhesive and done!! You can see the finished look above.


And here’s the close-up look on details

Hope this will inspire you, and we’ll meet on the next bridal bouquet ideas!!!!

Note:
The images taken at the bridal bouquet workshop by Andy Djati Utomo S.Sn, AIFD, CFD  on October 25th, 2012 at Landmark Convention Hall, Bandung.

Monday, December 3, 2012

Bridal Bouquet Parade (1) : The Beginning!


Looking at the title, y’all know already that this post series will be about bridal bouquet continuously J Yep, we’ll post lots of bridal bouquet pictures for your reference starting today!!! FYI, all those gorgeous bridal bouquets featured here are the creation of J Andy Djati Utomo S.Sn, AIFD, CFD since we’re reporting from his demo and workshop on October 25th, 2012 at Landmark Convention Hall, Jl. Braga 129 Bandung.

The workshop hall was still empty when I arrived, except two women in charge of the workshop. Best seat is important to get the best pics, right J? But before the exciting and exhausting workshop, we’re treated by morning tea and some snacks. The demo began at 9.17 a.m. and finished at 3 p.m.  In general, in this demo Mr. Andy made 6 bouquets and the two others by his assistants.


And here they are!!! The bouquet parade. We’ll post on them one by one. This time they’re numbered by the sequence of the post so you'd not wonder when your choice will be posted. Enough said, see ya on the next bridal bouquet post!!!!!

Wednesday, November 28, 2012

2012 Christmas Flower Decoration : A Bit of Nature

Our next Christmas décor ideas are still from the IPBI demo. It’s time to decorate your foyer, or your entrance…


This Christmas flower decoration will look grand on top of your cabinet, or your fireplace mantel, if you have one. A bit of branches will be needed, and it’s hard to find this kind of medium sized branches if you live in the city like me unless you chop it off the neighbor garden (not advisable!!). But this can be a good excuse for a picnic at the mountain… don’t forget to pick up some pinecones too while you’re there.


No, this is not a camping fireplace, but 3 branches put together like one, and secure with ropes.  The securing part might be the hardest part, if your kids happened to be in scout ask their help! I myself was in scout long long time ago and had forgotten with all the knot  n …*sigh*…

Mrs. Yani, one of the designers of this flower arrangement said, ‘make it as closely as possible like a deer’. ‘The original idea came from a deer that was walking around’, she continued.


Besides the branches we will also need lots of shiny silver and white Christmas balls ornament, ‘ijuk’ rope to tie the branches and no, those yummy looking red ones are not cranberries, we’re in the tropics, remember…. These are actually palm fruit seeds, secure them one by one with floral wire to be attached later. You must do it carefully but quite fast, since the more often and longer  you touch, the more mushy they become (not firm anymore) and certainly it would not attractive  to be used as accessories to attract the attention from the side of color.


And here’s the materials used such as medium size of branches, aspidistra leaves, pinecones (the big one is from Aussie, while the smaller ones are from local tree but I think it’s simply because of the difference type of trees only) and roses of sexy red.


Mrs. Yuyu and Mrs. Yulianti were performing their demo. They were helped by Mrs. Wiwit.

And this is the step by step tutorial:
First, cut some roses quite short (about 10 – 15 cm long depending on how big you’d like to make) then arrange them just like you’re going to make a round bouquet. Make two, one is in the position of the head and the other is above the legs (of the deer – imagine!)
Then take some aspidistra leaves, fold some of them by using ‘lidi’ or you can use staples. Then placed them on the right and left side of the head. Do it once again but this time at the position of the ‘tail’ and around it, and let 2-3 leaves unfolded, natural as it is.
After that attach some ball ornaments slightly below the head, at the abdomen, at the back and one ball as a tail.
Finally, put some red palm seeds at the neck in front and a few on the sidelines of roses and aspidistra leaves to cover the empty space.  


After adding those baubles..Voila!!! here’s the arrangement look from the front side. Since this arrangement itself is quite big, so make it as a focal point and do not add too many ornaments near it.


From another point of view, just look at those baubles!!!

That’s it for today. But don’t worry, we still have more Christmas décor to be posted this year, so keep on checking our blog!!!!


Saturday, November 24, 2012

2012 Christmas Dinner Decoration: Sparkling Silver

Ooooh, almost Christmas…. somewhat feel a bit melancholy this year, don’t know why, just that one year seems to fly so fast. Still remember those first Christmas post on flowerdeily a year ago. Surely hope our writing improve with time and you will read our posts on and on ...and don’t forget to support us by visiting our store J

Okay, enough daydreaming, it’s Christmas, guys! No time to dawdling since the early bird gets the best Christmas ideas, right? That’s also why IPBI DPC Bandung held another demo on Christmas decoration early this November, which means it’s time to share!!!!


The first in line is this sparkling silver theme table centerpiece which is very suitable for your elegant Christmas dinner. Made by Mr. Benny Natamadya (In case you forget him, just look at my previous post on his arrangements here), this arrangement boasts craft detail rather than expensive flowers.


The big candles (A) are made of 8 cm ordinary candles, dripped with candle wax to create the illusion of having being used. After that, spray some silver paint on it. My favorite is the addition of transparent bulbs (B) on top of them, very cute!! Almost looks like some bubbles come out from the candles.


Now the real candle to be lit during the meal is just tea-light candle put inside a wine glass. Then put some blue rocks inside for some glamour impact. These affordable colorful rocks can be found in your local florist or plant market.


Now on to the flowers, he’s using roses Mohana, Avalanche, Euro – fanta, papyrus, schefflera, pittosporum and ming fern to fill the empty space.


Here’s the look from above, as reference for you if you'd like to try by yourself.


And this is how it will look from eye level (Your guests’ eyes during dinnerJ). An affordable touch to create simple elegant Christmas table centerpiece. Well done, Mr. Benny!!!

Monday, October 15, 2012

Tutorial: How to Make A Standing Flower Arrangement

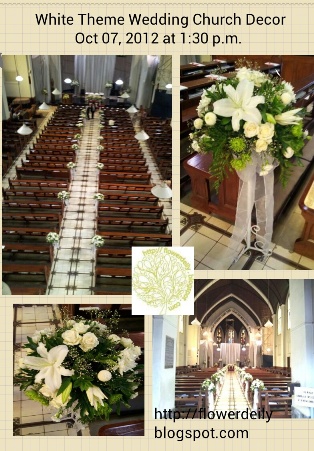
Wedding Church Decor doesn't look luxurious without row of standing flower arrangement along the aisle, as if they lead the couple headed to the altar. Those flowers also spread fragrant around it. It’s such a nice fragrance that could bring sweet memories of those who are attending of their youth.


The standing flower arrangements were lining along the aisle seen from the balcony. Looks amazing ya!! (image top left) and when taken from the front door (image bottom right)

Wondering how to make a standing flower arrangement like the one above? Actually it’s quite easy but you have to do it neatly and thoroughly. This time we are going to implement the ‘American Style’ by using grouping technique (though not totally) which means that the flowers were placed in group, but not for the foliage. The leaves were still spreading (European characteristic). Since the theme was ‘all white’, only a little bit green then the flowers we chose  were mostly white such as Casablanca, roses of Avalance’, chrysant-salju, shamrock, white spray carnation, white pom-pom or Billy button flower, baby’s breath and the foliage was philodendron (in medium and small size), ruscus and leather leaf. So, wanna try???


This is how to make a standing flower arrangement step by step:
1.                  Prepare the iron flower stand, then put the wet floral foam (cut into half) on it. After that strengthen it by using wire or plastic rope.
2.                  Decide where you’ll put the tulle white ribbon. Use this as the front side of the flower arrangement, where you put the focus of the flower.
3.                  Then ready to arrange the flowers now. First place 3 stems of philodendron (size M) in the form of triangle. Then place the leather leaf between them so that it’ll look circle now. After that take 5 stems of small sized philo leaf then arrange them above around the top.
4.                  Take 9 stems of chrysant – salju, cut into 20 – 25 cm length each. Then place them by using grouping technique in 3 points so as to form a triangle. Each group contains of 3 stems.
Take 12 stems of roses. Do the same steps just like number 4, but put the other 3 stems of roses at the top.
 .


1.                 Up to this stage, this is what it looks from the above. The shape should be round, otherwise there must be wrong with the way you cut. You might not cut the stems in the same length or not place the flower into the same depth.
2.            Then take 9 stems of shamrock, white poms and spray carnation. Set them all to fill the empty spaces so that it looks full and dense. Do this by using grouping technique.
3.            If there is still empty space, fill it with ruscus leaf, cut the leaves a bit shorter than the flowers. Finally place the Casablanca at the front, then spread the baby’s breath around the flower arrangement.
4.                  Finish. This is how it looks when it was put at the aisle.

 Ok guys, have a nice try!!!

Saturday, September 22, 2012

American Style Flower Arranging (part 7) : Practicing Time

Still remember the workshop of American Style by Andy Djati Utomo, S.Sn, AIFD, CFD? After the first session ended and all the participants got their lunch, it's time for practicing! Then the materials were distributed to all participants. The organizer provided several kinds of vases made of ceramic or wicker woven but unfortunately they couldn't choose what they like. They have just accepted what given to them. Also, when in the first session the participants saw lots of unique flowers and leaves used, but for practicing the organizer provided only standard flowers and leaves such as roses, gerbera, snapdragon (some got tuberose fragrant, instead) and futoy, foxtail leaves, cordyline and areca palm. Each participant was given 5 stems for every flowers and foliage. And they had to make the American style flower arrangement in 30-45 minutes. It's rather a short time for the participant who is familiar with the European style and for the first time got this theory. But we were amazed by their spirit to try something new though some of them were not young people. Just look at this one.


It's pretty good since this was the first time of her to make an American style flower arrangement. More over she could absorb the theory given and then implement it. Here she used most of the American floral design techniques such grouping, basing, terracing, framing and layering. She just should be more careful with the proportion or balancing in her design. That's all.


And here it is how to make an easy American style flower arrangement just like the one above step by step:
1.                  Prepare the container and then fill it with wet floral foam. If you use a tall ceramic vase with small mouth just like this one, then you need the foam thicker than the usual at about 3-4 cm from the mouth of the container so that you don't run out of space to place the materials.
2.                  Then trim the fourth tip fringe of the foam
3.                  Place the cordyline, 2 stems on the left side and 3 stems which 2 of them folded on the right side by using terracing technique.


4.                  Take 5 stems of foxtail leaf then place 3 of them on the center and 2 stems which were a little bit shorter at the front
5.            Take roses of ‘Mohana’, place them by using terracing technique. Then take gerberas, place 3 stems at the front using basing technique and 2 stems higher on the left side. After that place the white snapdragon by using layering technique.
6.                 Take futoy, fill inside with wire, then shape them just like the shape of insect repellent. Place them on the right side.  Pay attention to the length, always keep the proportion or balancing, so the design would be just perfect. Finished.

Tuesday, September 4, 2012

American Style Flower Arranging (part 6): Bridal Bouquet

Hand bouquet commonly held horizontally by Indonesian brides, but held vertically by American, just like holding an ice cone. It usually gives the consequences of different in making, in using techniques,  in design, in concept and of course in look as the final result. For those who are looking for something different, unusual, new, or beyond your daily look, this one is perfect for you guys. We personally like this bridal bouquet. The design is unique, so bravo for the floral designer, Mr. Andy Djati Utomo, S.Sn, AIFD, CFD.


From the image above, you can see that not only the basic American Floral Design Techniques such as basing, grouping and terracing techniques were used here but also binding, framing, and sheltering as well. Perfect example, isn’t it?


Wanna try to make the beautiful American style bouquet just like the one above? Here’s the step by step how to make it:
1.          First of all, Mr. Andy Djati Utomo showed how the American brides to hold the bouquet - vertically, just like holding an ice-cream cone.
2.               Take 3 pieces of woven leaves of lily paris, then place them in a group at the front. Arrange the length of them that do not look monotonous . Take some ivy leaves. If they're not thick enough and don't dangling beautifully, then tie two ivy leaves with floral wire from the top up to the end so that you are now able to form it as you wish.
3.            Take 2 stems of green anthurium. As we need rather high, so attach floral wire to the stem, then secured it with floral tape. Place them by using terracing technique to balance the lily paris leaves.
Take 3 stems of pink gerbera. Cut them short enough then place them as focus in the center by using terracing technique.
Take 4 stems of two tone color of calla lily (white & maroon) then place them a bit on the right side of lily paris leaves by using layering technique.
Take 2 stems of futoy, insert the wire into the stem then by using framing technique, place them to the opposite side of the calla lilies to give balancing of the right and left side of the flowers arrangement.
Then place the other flowers rest such as caspea, statice, purple roses and red celocia. Also do not forget to fill the foam seen with ruscus leaf.
4.         One more, don’t let the holder looks plain, so this is how to make ‘under the holder’ looks different. It’s done by Mr. Johanes Priyono, the assistant of Mr. Andy.
5.                   Finished.


 This is how the bouquet look from the front


Since it was held vertically, therefore, the back of the bridal bouquet is usually vacant. So as not to contact with the body of the bride as well as her wedding gown because some types of flowers, such as lilies can leave stain (from its stigmas) that not able to be washed easily. So, please be careful if you do with bridal bouquet. Give extra attention to the flowers selection and to the work, for example, do not let any thorns still attached to the stems of the roses that can injure the bride's hands or tear the wedding gown. You don’t want to be sued or pay for compensation, do you?

Note:
Pictures taken at the workshop by Andy Djati Utomo, S.Sn, AIFD, CFD, on May 16th, 2012 in Bandung, West Java.

Sunday, August 12, 2012

Workshop Ribbon (part 4): A Variation of Ribbon Bow


 This is another variation on the basic ribbon bow. It’s like a lotus flower. Unique, isn’t it?


Here it’s step by step to make a lotus flower ribbon bow.
Step 1 Make some loops then tied with wire (see again the basic ribbon post)
Step 2 Take a loop then cut it off in the middle.


Step 3 Take another loop. Again, cut it off but longer than the first one. Repeat this until the last loop. Make sure each time you cut, it's longer than the previous one.
Step 4 Cut the both ends so that it'll look curved
Step 5 By using one side of sharp scissors and your fingers, make an upward curved movement on each end so they stay curly.
            Shape it so that it'll look natural.

By this way you can also make another different look of flowers such as spider chrysant. Use a narrow ribbon or just divide the ribbon into 2 but you should make more loops ie doubled thicker. Try it!!

Note:
Images taken at the IPBI DPC Bandung's Monthly Gathering on May 24th, 2012.
Instructor: Mr. Harry Zulkarnaen

Saturday, August 4, 2012

Workshop Ribbon (part 3) : A Loopy Ribbon Bow


By giving a bit variation on a basic ribbon bow (see our old post on Ribbon Workshop – part 2, July 12th.), you can get another look of ribbon, just like this one - a loopy ribbon.  It looks nice on gift boxes, too.  


Here it’s step by step how to make the loopy ribbon just like the image above:
Step 1.            Make some loops then tied with wire (see again the basic ribbon post)
                        Just like as if you made a butterfly with 2 wings, the left and right wing/loop.
Step 2.            Ok, first do on the left wing/loop. Find the top of loop then cut a bit the right edge, be careful do not cut it off. (see the image below)


Step 3.            Do the same to the other side, but this time in the opposite direction or vice versa. Now we get the left loop just like the image above.
Step 4.            Repeat step 2&3 in the same way on the right loop. The final look of the loop should be like this. (image below)
                      At this point you just pull the loop one by one, starting from the middle to the outer loop/last loop. Shape it how you’d like.


This is what it will look if you've gathered 2 different color of loopy bows. (image above)
And this is when you gather 3 orange loopy bows. It looks full, just like a ball. Gorgeous, isn’t it?  It's also nice as a wedding décor. Simple and easy to make, as well as not expensive. (image below)

Note:
Images taken at the IPBI DPC Bandung's Monthly Gathering on May 24th, 2012West Java. 
Instructor: Mr. Harry Zulkarnaen


Related Posts Plugin for WordPress, Blogger...

About Us

My photo
Hi!! Welcome to http://flowerdeily.blogspot.com. It is a floral design blog created and managed by Flo and little Flo. We have the same passion in any kinds that related to flowers especially Flo as she has been joining in a group of floral designers for church for dozen years. We wish to share our thought in flower arrangement, exchanging floral ideas and hopefully this can be an inspiration for your daily life, housing decor and of course for your wedding. Thanks so much for stopping by.