Showing posts with label home decor. Show all posts

Wednesday, January 23, 2013

City Life City Garden 2012 (5) : Ultra White Minimalist Garden

This is it!! For those of you who love the super clean minimalist style, this can be your inspiration. J This is an all white garden (except for the plants of course) with the focal point being the white boxes drawn like buildings (4D). They can be used as plant pots or as base for the lighting fixtures.


For those of you who want to add some animal statues to your garden but afraid to ruin the minimalist theme, this wire swan painted in white (4A) can be a reference.

Also noticed the tile (4B), instead of the boring square tile, you might want to try cut them into triangles, then pour some gravels between them, it will break the monotonous white theme, but still look minimalist.


For the plants, to support the white minimalist theme, choose plants and flowers in pale pastel colors, as seen here, no bold colors for the flowers. Don’t forget to put some hidden lamps behind the pots. Lovely!!!!


Okay, from all those garden installation at City Life City Garden 2012, these four posts are the ones that we think are the best 4. So, we sincerely hope these can be your garden inspirations, especially for a mini gardens. However, we’re not done with this expo yet, since we haven’t share with you’re the flower and plants market, so, just wait and see…

Tuesday, January 8, 2013

Home Decor Ideas by Eunice Teo (3) : A Simple Table Centerpiece with Crystal Accent

A little break on the bridal bouquet post series, yes… just to remind you all that we do have a home & décor section here on flowerdeily, so let’s check out this simple flower table centerpiece designed by Eunice Teo, AIFD


This time, she used a tall cocktail glass as a vase, yellow color foam and lots of crystal beads. Though the use of crystal beads usually tends impress glamorous and modern, she did the flower arranging in minimalist way by using not much flowers and leaves. And the white snapdragon and cordylines applied the horizontal design perfectly.


On closer look, not just crystal beads, she also used butterfly shaped crystal as a focal point on this table centerpiece.


And here’s a close up detail of the crystal beads swirled on the bottom of the transparent vase. Lovely!

Yep, next post on this series, we’ll be back with the bridal bouquet post. Keep on checking J

Tips:
When using color foam, it would be better if you just let it what it is. Do not cover the foam. It will make your design look different but do not forget to soak the foam before you use it, ya.
And so is with the accessories, you must know what you use so it can be beautiful on your design.

Tuesday, January 1, 2013

New Arrival: Artificial Orchids


Hi, everyone!!! It’s nice to see you again.

Starting the first day of 2013, we’ll post our new artificial orchids which made of silicone. Since they’re flexible, so you can bend them in the direction you want. They’re suitable with all kinds of vases whether they are square, oval, sphere, low or tall vases which made of glass, ceramic or any material vases available in your home. Use all of your creativities to arrange them and in the count of minutes … a simple flower arrangement is ready to decor your home. Orchids always look luxurious though in simple design. Then the flower arranging activity becomes much easier, doesn't it? Wanna try? Visit our web store at www.floplus.com


Wednesday, December 12, 2012

New Topiary


Another new topiary had been sent


the flower arrangement from the front


back side view

Tuesday, December 4, 2012

Still Another Inspirations for Christmas Décor 2012


And now this is another Christmas flower decorations ideas, this is done by Mrs. Tania.  The only Christmas ornament we can see is the golden baubles, no poinsettia, 'cranberry like' fruit or other Christmas resemblance. In this arrangement, she’s more focus into the Christmas colors and the design.  As you can see in the picture above, the folded cordyline leaves can balance the length of the anthurium stems. Since the flower arrangement is quite big, so if your living room is not big enough, it's advisable if you put it at the corner table. It's much safer there, especially if you have quite lot of kids, nephews & nieces at home.


This is the details of the materials she used such as anthurium, roses, cordyline, phittosporum and gold color christmas balls.

Here’s an even more closer look on the roses christmas ball

After this, we’ll show you some christmas tree decorations ideas. Yup, enough on the table centerpiece, let’s begin with the trees!!!!

Note:
The images were taken at the IPBI DPC Bandung's Monthly Gathering on Nov 22nd, 2012.

Sunday, December 2, 2012

Our Christmas Joy : New Advent Wreath Order


Yaaayyy….just finished another Christmas wreath! This time made for our dearest friend Flora, thanks ya. We will post on the making process later, but first…..


Let’s ship this one first!!!! 

Wednesday, November 28, 2012

2012 Christmas Flower Decoration : A Bit of Nature

Our next Christmas décor ideas are still from the IPBI demo. It’s time to decorate your foyer, or your entrance…


This Christmas flower decoration will look grand on top of your cabinet, or your fireplace mantel, if you have one. A bit of branches will be needed, and it’s hard to find this kind of medium sized branches if you live in the city like me unless you chop it off the neighbor garden (not advisable!!). But this can be a good excuse for a picnic at the mountain… don’t forget to pick up some pinecones too while you’re there.


No, this is not a camping fireplace, but 3 branches put together like one, and secure with ropes.  The securing part might be the hardest part, if your kids happened to be in scout ask their help! I myself was in scout long long time ago and had forgotten with all the knot  n …*sigh*…

Mrs. Yani, one of the designers of this flower arrangement said, ‘make it as closely as possible like a deer’. ‘The original idea came from a deer that was walking around’, she continued.


Besides the branches we will also need lots of shiny silver and white Christmas balls ornament, ‘ijuk’ rope to tie the branches and no, those yummy looking red ones are not cranberries, we’re in the tropics, remember…. These are actually palm fruit seeds, secure them one by one with floral wire to be attached later. You must do it carefully but quite fast, since the more often and longer  you touch, the more mushy they become (not firm anymore) and certainly it would not attractive  to be used as accessories to attract the attention from the side of color.


And here’s the materials used such as medium size of branches, aspidistra leaves, pinecones (the big one is from Aussie, while the smaller ones are from local tree but I think it’s simply because of the difference type of trees only) and roses of sexy red.


Mrs. Yuyu and Mrs. Yulianti were performing their demo. They were helped by Mrs. Wiwit.

And this is the step by step tutorial:
First, cut some roses quite short (about 10 – 15 cm long depending on how big you’d like to make) then arrange them just like you’re going to make a round bouquet. Make two, one is in the position of the head and the other is above the legs (of the deer – imagine!)
Then take some aspidistra leaves, fold some of them by using ‘lidi’ or you can use staples. Then placed them on the right and left side of the head. Do it once again but this time at the position of the ‘tail’ and around it, and let 2-3 leaves unfolded, natural as it is.
After that attach some ball ornaments slightly below the head, at the abdomen, at the back and one ball as a tail.
Finally, put some red palm seeds at the neck in front and a few on the sidelines of roses and aspidistra leaves to cover the empty space.  


After adding those baubles..Voila!!! here’s the arrangement look from the front side. Since this arrangement itself is quite big, so make it as a focal point and do not add too many ornaments near it.


From another point of view, just look at those baubles!!!

That’s it for today. But don’t worry, we still have more Christmas décor to be posted this year, so keep on checking our blog!!!!


Tuesday, November 27, 2012

World Peace Theme Advent Wreath 2012

Happyyyyyy!!!!! This Christmas Season started off well, our store started to receive the usual order of wreaths.


Already boxed and ready to be shipped!!! This order is from the chief of St. Elizabeth, Mrs. Fransisca, to be used in the pray of 1st – 4th Advent weeks in our region which is starting on Dec 2nd , 2012. We got another order from our dear friend, Miss Flora yesterday evening. Thank you so much friends for trusting us in this holy event … We will post a tutorial on this Advent wreath, just wait and see J
Saturday, November 24, 2012

2012 Christmas Dinner Decoration: Sparkling Silver

Ooooh, almost Christmas…. somewhat feel a bit melancholy this year, don’t know why, just that one year seems to fly so fast. Still remember those first Christmas post on flowerdeily a year ago. Surely hope our writing improve with time and you will read our posts on and on ...and don’t forget to support us by visiting our store J

Okay, enough daydreaming, it’s Christmas, guys! No time to dawdling since the early bird gets the best Christmas ideas, right? That’s also why IPBI DPC Bandung held another demo on Christmas decoration early this November, which means it’s time to share!!!!


The first in line is this sparkling silver theme table centerpiece which is very suitable for your elegant Christmas dinner. Made by Mr. Benny Natamadya (In case you forget him, just look at my previous post on his arrangements here), this arrangement boasts craft detail rather than expensive flowers.


The big candles (A) are made of 8 cm ordinary candles, dripped with candle wax to create the illusion of having being used. After that, spray some silver paint on it. My favorite is the addition of transparent bulbs (B) on top of them, very cute!! Almost looks like some bubbles come out from the candles.


Now the real candle to be lit during the meal is just tea-light candle put inside a wine glass. Then put some blue rocks inside for some glamour impact. These affordable colorful rocks can be found in your local florist or plant market.


Now on to the flowers, he’s using roses Mohana, Avalanche, Euro – fanta, papyrus, schefflera, pittosporum and ming fern to fill the empty space.


Here’s the look from above, as reference for you if you'd like to try by yourself.


And this is how it will look from eye level (Your guests’ eyes during dinnerJ). An affordable touch to create simple elegant Christmas table centerpiece. Well done, Mr. Benny!!!

Friday, August 17, 2012

A Mixed Tropical Color Centerpiece

We'd like to take this opportunity to wish every moslem the holy feast of Idul Fitri 1433H
 May the blessing, mercy and grace of the God Almighty always be with everyone on this earth.


Interested? For further information, please visit our webstore at: www.floplus.com

Saturday, July 28, 2012

American Style Flower Arranging (part 5)

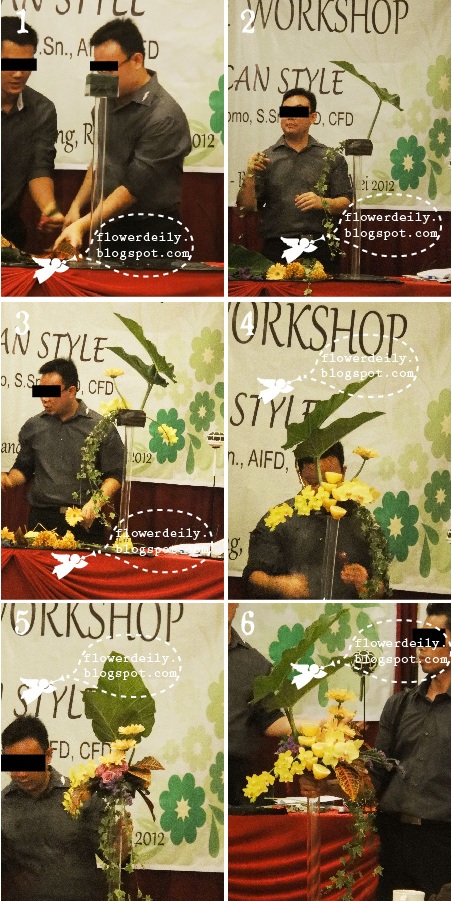
This is another example of American style to place big flower/leaf on top, which is not common at first, while in European style, the biggest material is usually placed at the bottom and the smaller at the upper. But as long as the small flowers/leaves are laid in grouping or you can also use terracing technique, so overall they will be looked big because they’re viewed as a unity and not per stem.  So, no problem with placing big material on top, right? It will even make the design look special and not customarily. We personally like this one. It’s unique!!


Close up look 


Here they are how to make this beautiful unique American-style flower arrangement step by step.
Step 1 Prepare a high acrylic vase. Fill the container with wet foam, leave 2-3 cm from top of the container then trim the edges of foam.
Step 2 Take 2 stems of big marble philo, attach the stems with wire. Then  by using sheltering techniques place  both leaves in the middle, not upright but slightly to the right.
            Take some ivy leaves. Hang them down opposite to philo leaves.
Step 3 Take 2 stems of orchid. Attach the stems with silver or copper wire, then place them on the right side.
            Take some statice then put on the left side to balance the orchid.
Step 4 Take 3 stems of gerbera, attach wire. Place them by using terracing technique starting from the middle to the left side. Arrange all the flowers facing above.
          Take 2 lemons, cut into 2 then prick the half lemon with skewer but careful, do not penetrate the other side. Then put them as focus by using terracing technique.
         Note: Do not use wire to prick the fruit, because fruit contains acid. If wire in contact with acid it would become rust which can change the fresh fruit into rotten as well as dangerously to be eaten.
Step 5 Take 4 croton leaves. By using terracing technique place 2 of them under the gerbera and the other 2 beside the orchid.
            Take some purple roses. Cut them short and place them between the croton leaves, above ivy leaves and statice.
            Take some ruscus. Cut them short, leaf by leaf. Then use them to fill the empty area so that no foam can be seen.
Step 6 Finished


The design looks like as if there was effect of rain or hot sun. Then the flowers would be covered by big leaves.  Just like umbrella protecting us from the scorching sun. Gorgeous!!

Note:
Pictures taken at the workshop by Andy Djati Utomo, S.Sn, AIFD, CFD, on May 16th, 2012 in Bandung, West Java.

Monday, June 25, 2012

American Style Flower Arranging (part 2)


The materials used to make the flower arrangement like this are snapdragon, gerberas, red and yellow celosia or cock comb and the foliage is anthurium leaf, red and green cordyline, futoy, alokasia or tombak Irian, justicia or rugball and ruscus.


And here’s the step by step tutorial:
  1. Prepare a round ceramic vase of medium height (15 - 20 cm). Fill in with wet floral foam, cut the top but leave 1 - 3 cm from the mouth of the vase and then trim the edges.
  2. Take a stem of snapdragon flower, measure the length approximately 3x the height of the vase, cut it. Then put it a bit in the middle, not in upright position but slightly skewed to the left. Do the same for the other two snapdragon but with different length, shorter than the first one.
Take 3 anthurium leaves, put it in sequence by using terracing techniques, give among them a bit distance so that not to stick together.
  1. Take 4 pieces of red cordyline, fold three of them each in different length. First put the longest leaf approximately 135° toward the right opposite the direction of the anthurium leaves, after that do the same for the rest of the leaves, all lead toward the middle.
  2. Take 3 pieces of green cordyline, now place them across from the red ones. Now the flowers arrangement has 3 dimensional look.
Take a gerbera, cut very short then attach at the front. From this one, do the same with the other four gerberas by using basing technique but in different height. 
Make all the gerberas facing upwards, so they look like flower protected by the other higher flowers.


  1. Take some futoy stems (20-25 cm long), stick together by using wire, then place it in the middle of the arrangement. (You might need 2-3 skewers to do this)
Take 2 alokasia leaves then put them opposite direction to the snapdragon.
  1. Take some red celosia, cut them short and place them at the front on the left side of the gerbera while on the right side filled with 2 snapdragon (cut shorter than the other snapdragon placed opposite)
Take 2 stems of yellow celosia, placed below the alokasia.
  1. Last one, put justicia or rugball among yellow celosia, green cordyline, and red celosia. Then fill the empty place with foliage, cut it short to cover the floral foam. Make sure that there isn’t any floral foam seen, ok?
  2. Done.

The flower arrangement seen from the front and side view.


Up close look (image above), the red and yellow celosia look fantastic while the justicia or rugball looks so cute, doesn’t it? It is alike yellow sisal.


Note:
Images taken at the workshop by Andy Djati Utomo S.Sn, AIFD, CFD, May 16th 2012, in Bandung.


Tuesday, May 29, 2012

Introducing: World of Birds


Interested? For further information, please visit our webstore at: www.floplus.com


Friday, May 25, 2012

Simple Recycle Idea


To make a flower arrangements for home décor, most people will think of expensive vase, a beautiful complicated arrangements and so on. Well, there’s price, there’s quality. A unique, and artful vase is surely expensive, but yes, they will give an elegant touch to your home. Nevertheless, it doesn’t mean that a more affordable vase will surely look bad and cheapy as a décor. This arrangement is one proof of it. Made by using used sauce bottles, the flower arrangement will make your house look more lovely and also help save the earth by reducing waste! What a good idea!!!


To make this arrangement, you will need yellow fiji, another varian of chrysanthemum, ivy leaves, floral green plastic tubes and some wire. First, fill in the floral tube with water then put its cap tightly. Put the stem of ivy into the tube through the cap then make circles of ivy. Do this until the desired thickness and size then secure with wire. Then put three green bottles (you can use beer bottles, sauce bottles etc, but best in same size and colors and labels removed). Put the ivy circle on them, secure the bottles and ivy circle together with wire (must be strong enough so not to fall off). Last, put one fiji or chrysanthemum flower in each bottle…done!!


Here’s the close up look of the flower arrangements.


And here is another idea of arranging the chrysanthemums : first get a small plastic used-bottle (you can use plastic bottles for yoghurt or other kinds of drink), wrap it with colored tisue paper, and put some furry wire around it, secure the wire to a long branch. Do the same with the other bottles and branches.Then just put the chrysanthemums into it!! So, now you have a pots-tree-like with chrysanthemum flower in it.
Okay, stay tune for our next post!!


Pictures taken from Flower Arranging Demo at Hero Supermarket
Floral Designers: Mrs. Angelina, Mrs. Winny, and Mr. Okky


Related Posts Plugin for WordPress, Blogger...

About Us

My photo
Hi!! Welcome to http://flowerdeily.blogspot.com. It is a floral design blog created and managed by Flo and little Flo. We have the same passion in any kinds that related to flowers especially Flo as she has been joining in a group of floral designers for church for dozen years. We wish to share our thought in flower arrangement, exchanging floral ideas and hopefully this can be an inspiration for your daily life, housing decor and of course for your wedding. Thanks so much for stopping by.